
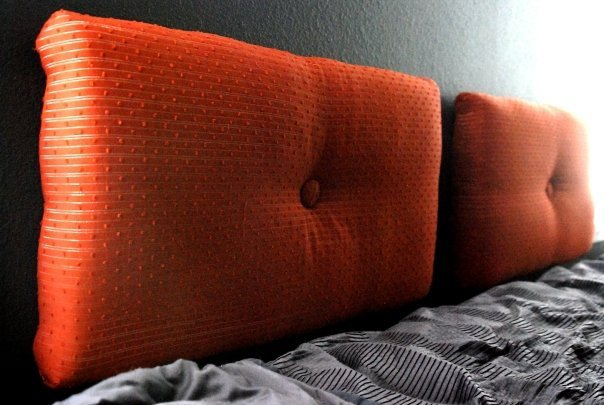
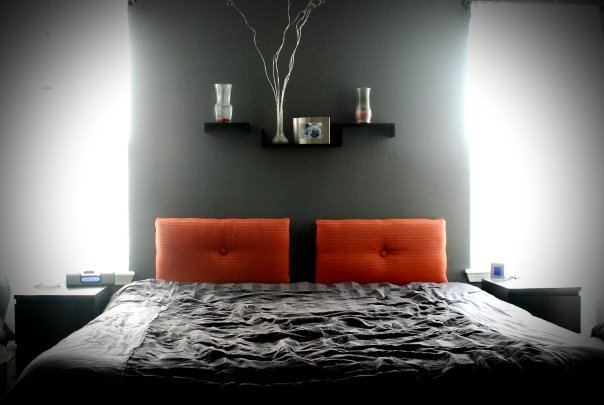
I’d always wanted a nice soft headboard to lean against, for those evenings when I want to sit in bed and read or watch television. But EVERYthing I looked at to buy in stores or online was incredibly expensive & definitely way out of my budget. So I embarked on figuring out how to make my own. I’m happy to say it was a huge success & came out exactly how I had hoped. I did these orange ones at our first house, and then recovered them with different fabric after we moved to our second house and I changed our master bedroom color scheme (you’ll see those in the following photos). Here’s what the first set looked like all nice & finished:
So obviously I made two separate pieces for our headboard, but if desired you can do one long piece of wood for a single-piece headboard.
When I was making them I didn’t take photos of every single step (oops), but below are some pics and descriptions to help you along your way if you want to give it a shot!
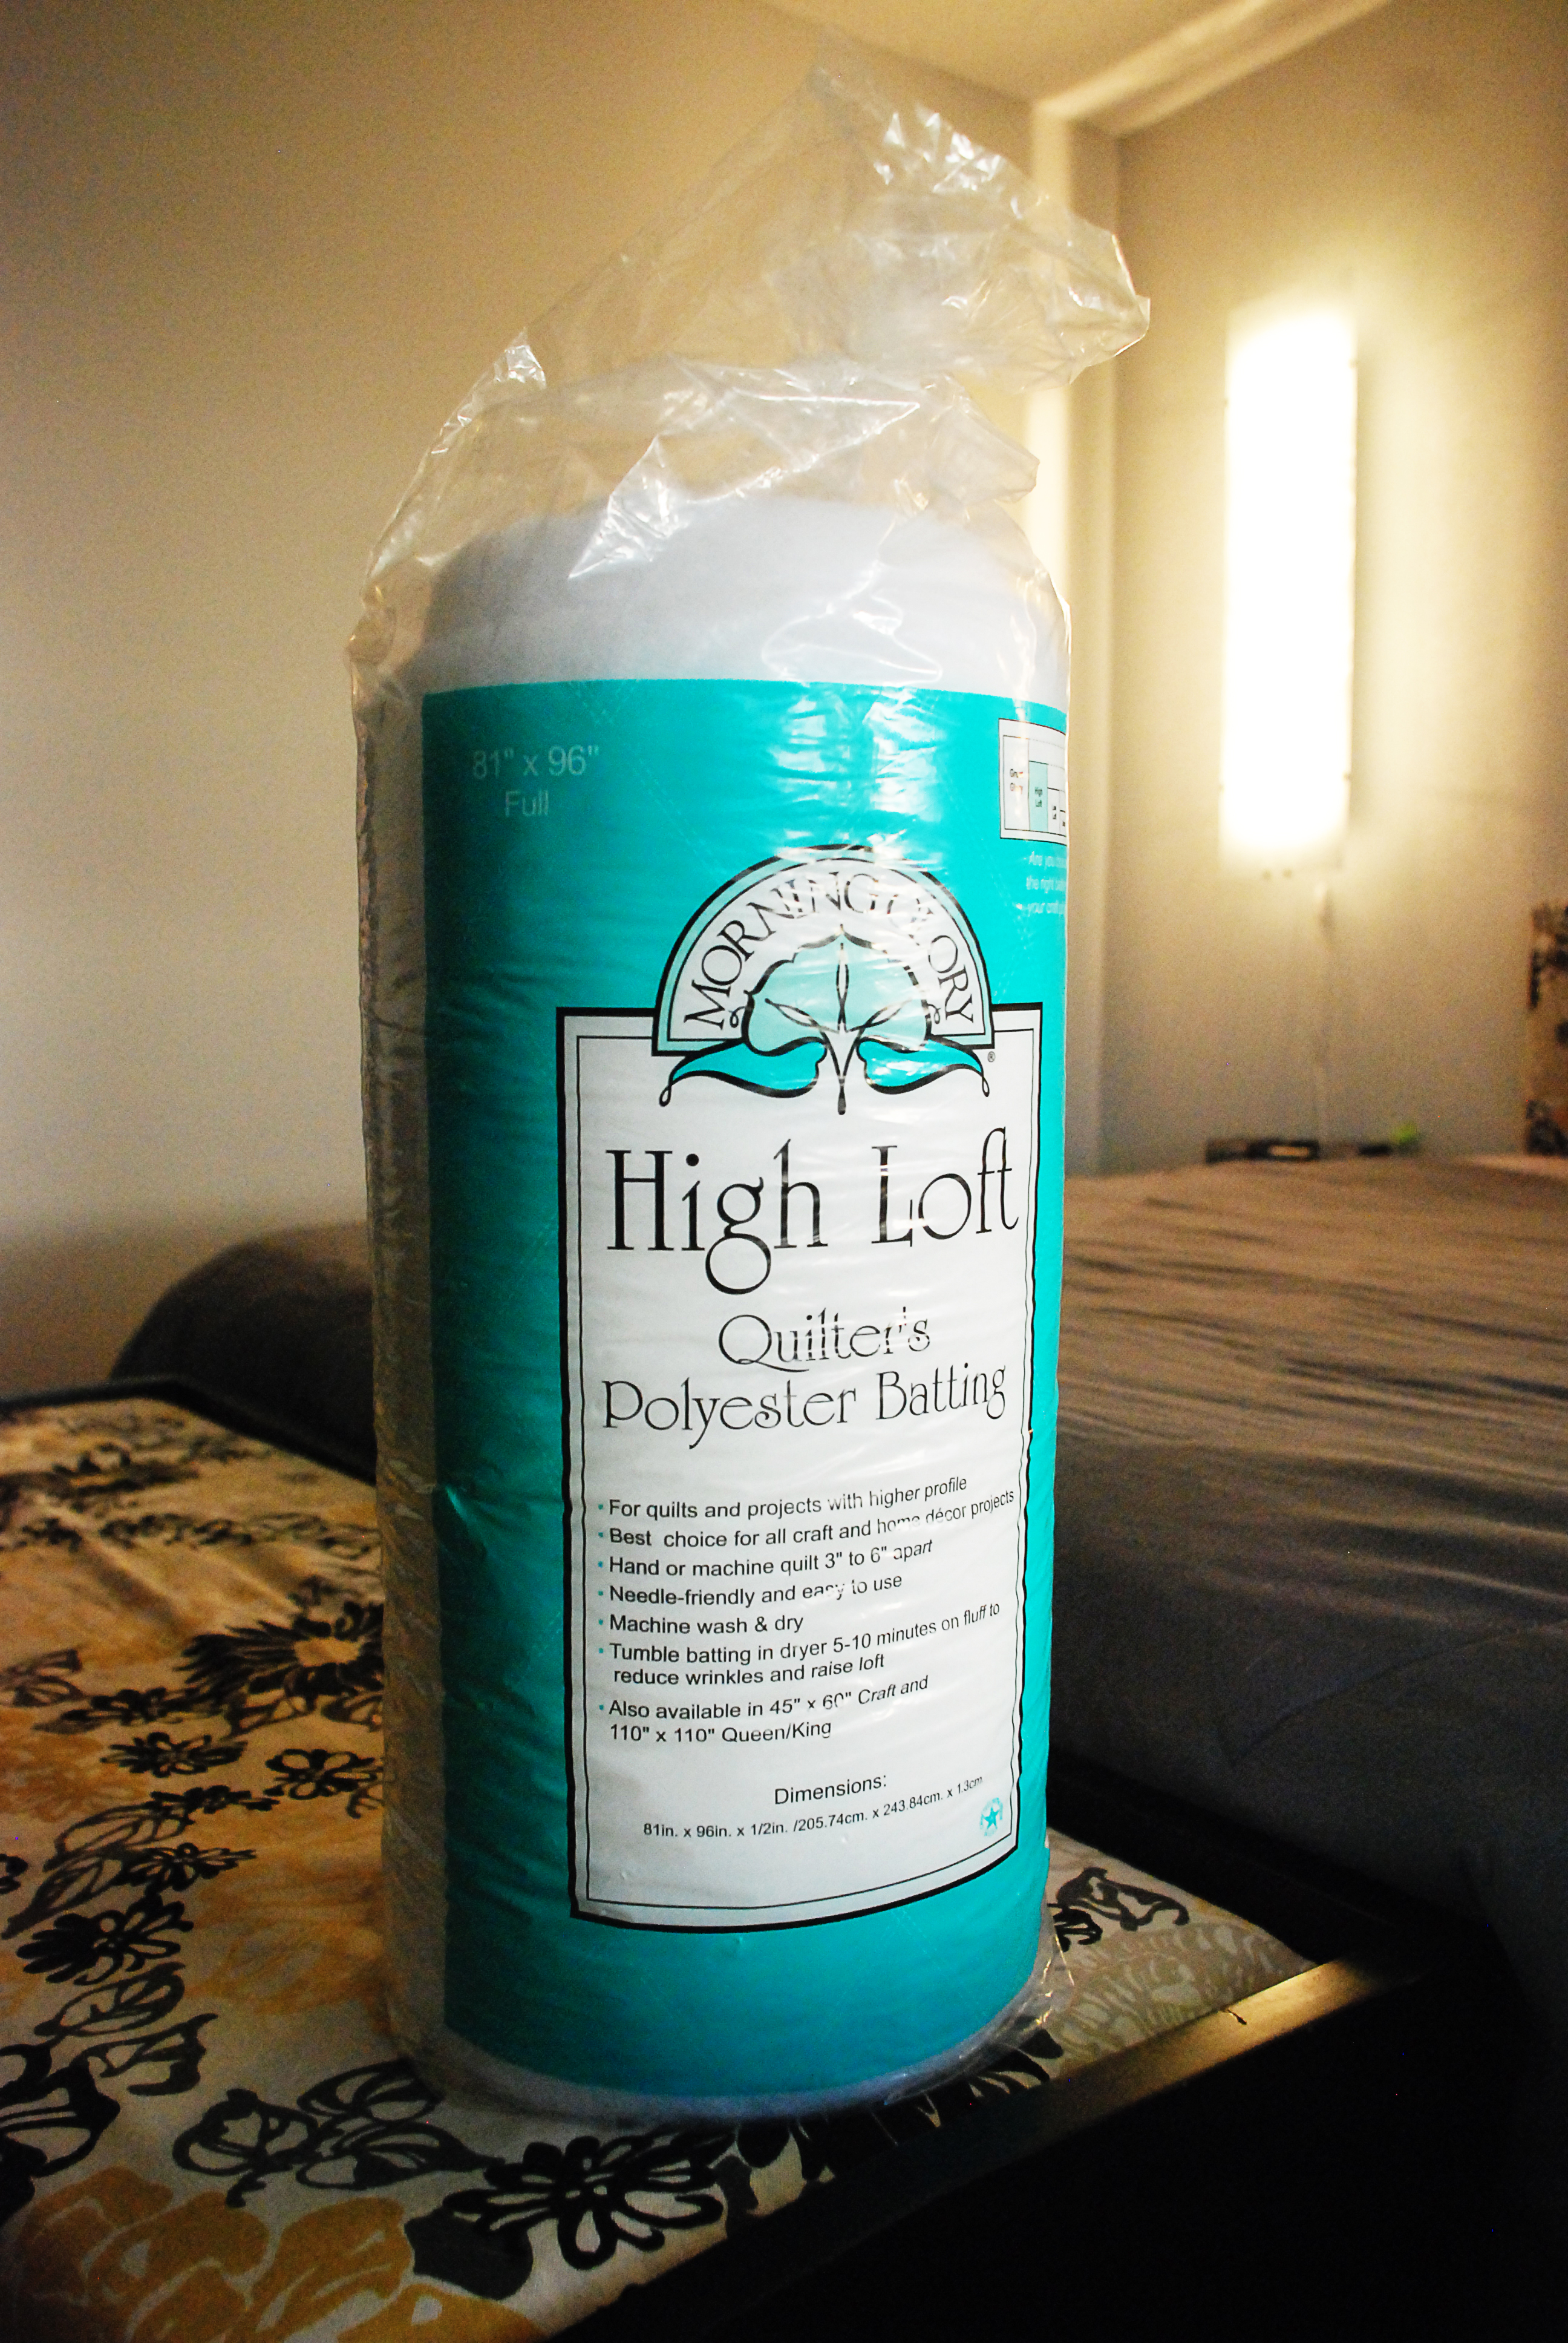
WHAT YOU WILL NEED: Wood cut to desired size of headboard(s), batting, fabric, two large buttons, staple gun, thin gauge wire (like what you’d use to make jewelry) to hold buttons (this’ll make sense later), wall mounts.
MY TOTAL PROJECT COST BREAKDOWN (this will vary depending on how/where you get your supplies): Wood blocks: $2 on clearance; Batting: $7; Fabric: $5 on sale; Buttons: $3; Wall Mounts: $14; TOTAL of approx. $33 for a one-of-a-kind headboard!!!
Step 1: To start you obviously need two pieces of wood that are the same size, to be the base. The wood I used actually came from IKEA’s clearance section. They had a bunch of mismatched pieces of shelving that were going for around $1 a piece, and there happened to be two that were exactly the same size! They are about 2 inches thick, 12′ 5″ long, and 15″ wide.
Step 2: Before doing anything else, measure to the very center point of the boards and drill a small hole where the button will need to go later on.
Step 3: Take the batting and cut it to size so that it can cover the front & wrap around the edges (and a few inches onto the back) of your wood, providing nice soft edges. Use as many layers as you’d like, depending on how cushy you want your headboard to be. Thin foam can also be used for this step, but will definitely cost you more & can’t be wrapped around the edges like batting can be. I got two bags of batting at Wal-Mart for $7 total, although I only ended up needing one bag.
Step 4: Use your staple gun to secure the layers of batting to the back of the wood.
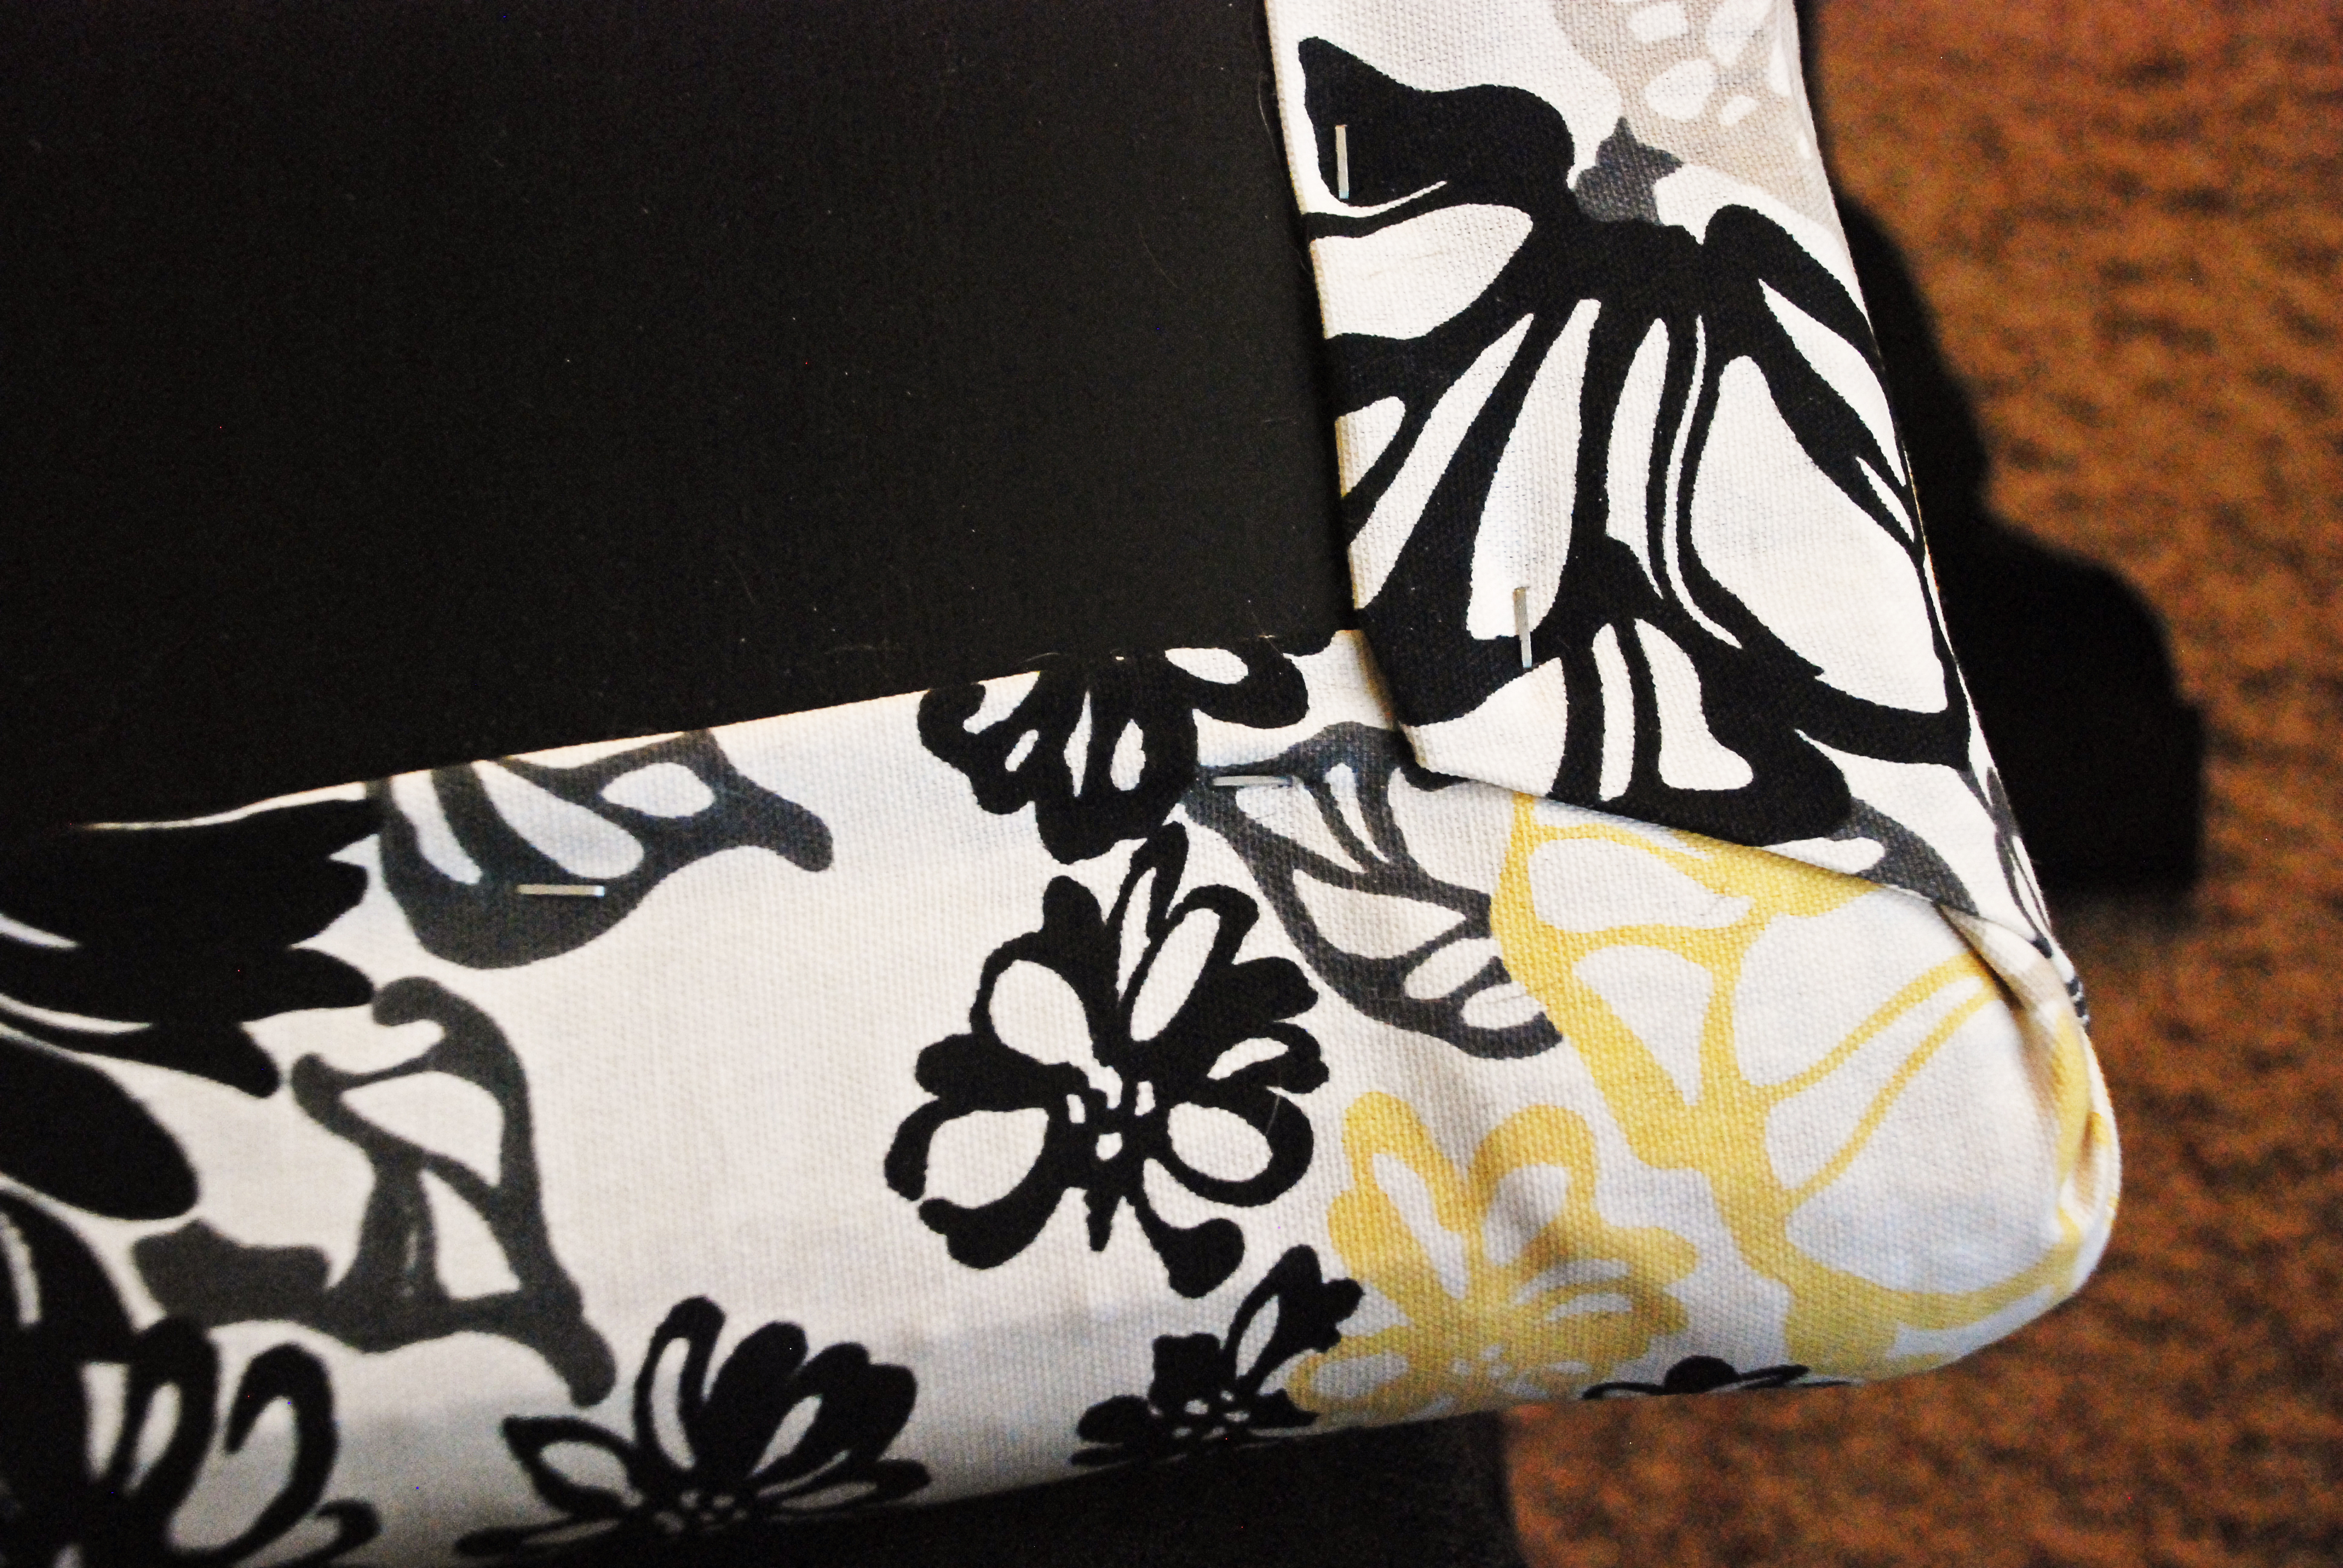
Step 5: Lay your fabric out with the wood on top so you can measure out & cut enough fabric so that you can wrap the fabric around the wood (and the batting which is now attached) to be stapled in the back. A few inches of extra fabric on each side should do it, depending on how thick your boards are. Obviously this doesn’t have to be the world’s most perfect cut since no one’s going to be looking at the back of your headboard!
Step 6: Begin to fold the fabric over the edges and use the staple gun to secure them in the back as you go. I folded the edges of the fabric over itself in the back as I stapled so that the fabric would be more secure and not rip. Be sure to pay attention to how tight the fabric needs to be so that the batting isn’t in danger of tearing or sliding around beneath. In terms of the ends of the headboard that are visible, I found that folding the fabric like I was gift wrapping a present looked quite nice! The good news is if you mess up you can always pull the staples out and try again. 🙂

Step 7: Now that the boards are covered with batting and fabric, it’s time to add the buttons. (If you don’t want buttons, you are free to skip this step!) For the buttons on my headboard, I used a cheap little button cover maker and some fabric scraps so that they matched. Take the thin wire and poke it through the back of the hole you previously made in the headboard, and THROUGH the fabric so that it’s poking out both the front AND the back. Take your button and secure it to the wire by just threading the wire through the hole in the back of the button and twisting it around. Now that the button is attached to the wire, gently pull the other end of the wire (that’s coming out the back) until the button is being tightly held in to its position. Secure the wire to the back using a small piece of scrap wood, or anything that you can wrap the wire around really! Even a broken pencil would do, ha ha!
***If you don’t have wire, this may also be possible with very thick thread, although I’ve never tried it this way, and I like the wire because I don’t have to worry about it breaking***
Pictured below: The first picture is the back with the wire being held by a piece of scrap wood. The second is the front with the button being held tight by the wire pulling from behind.


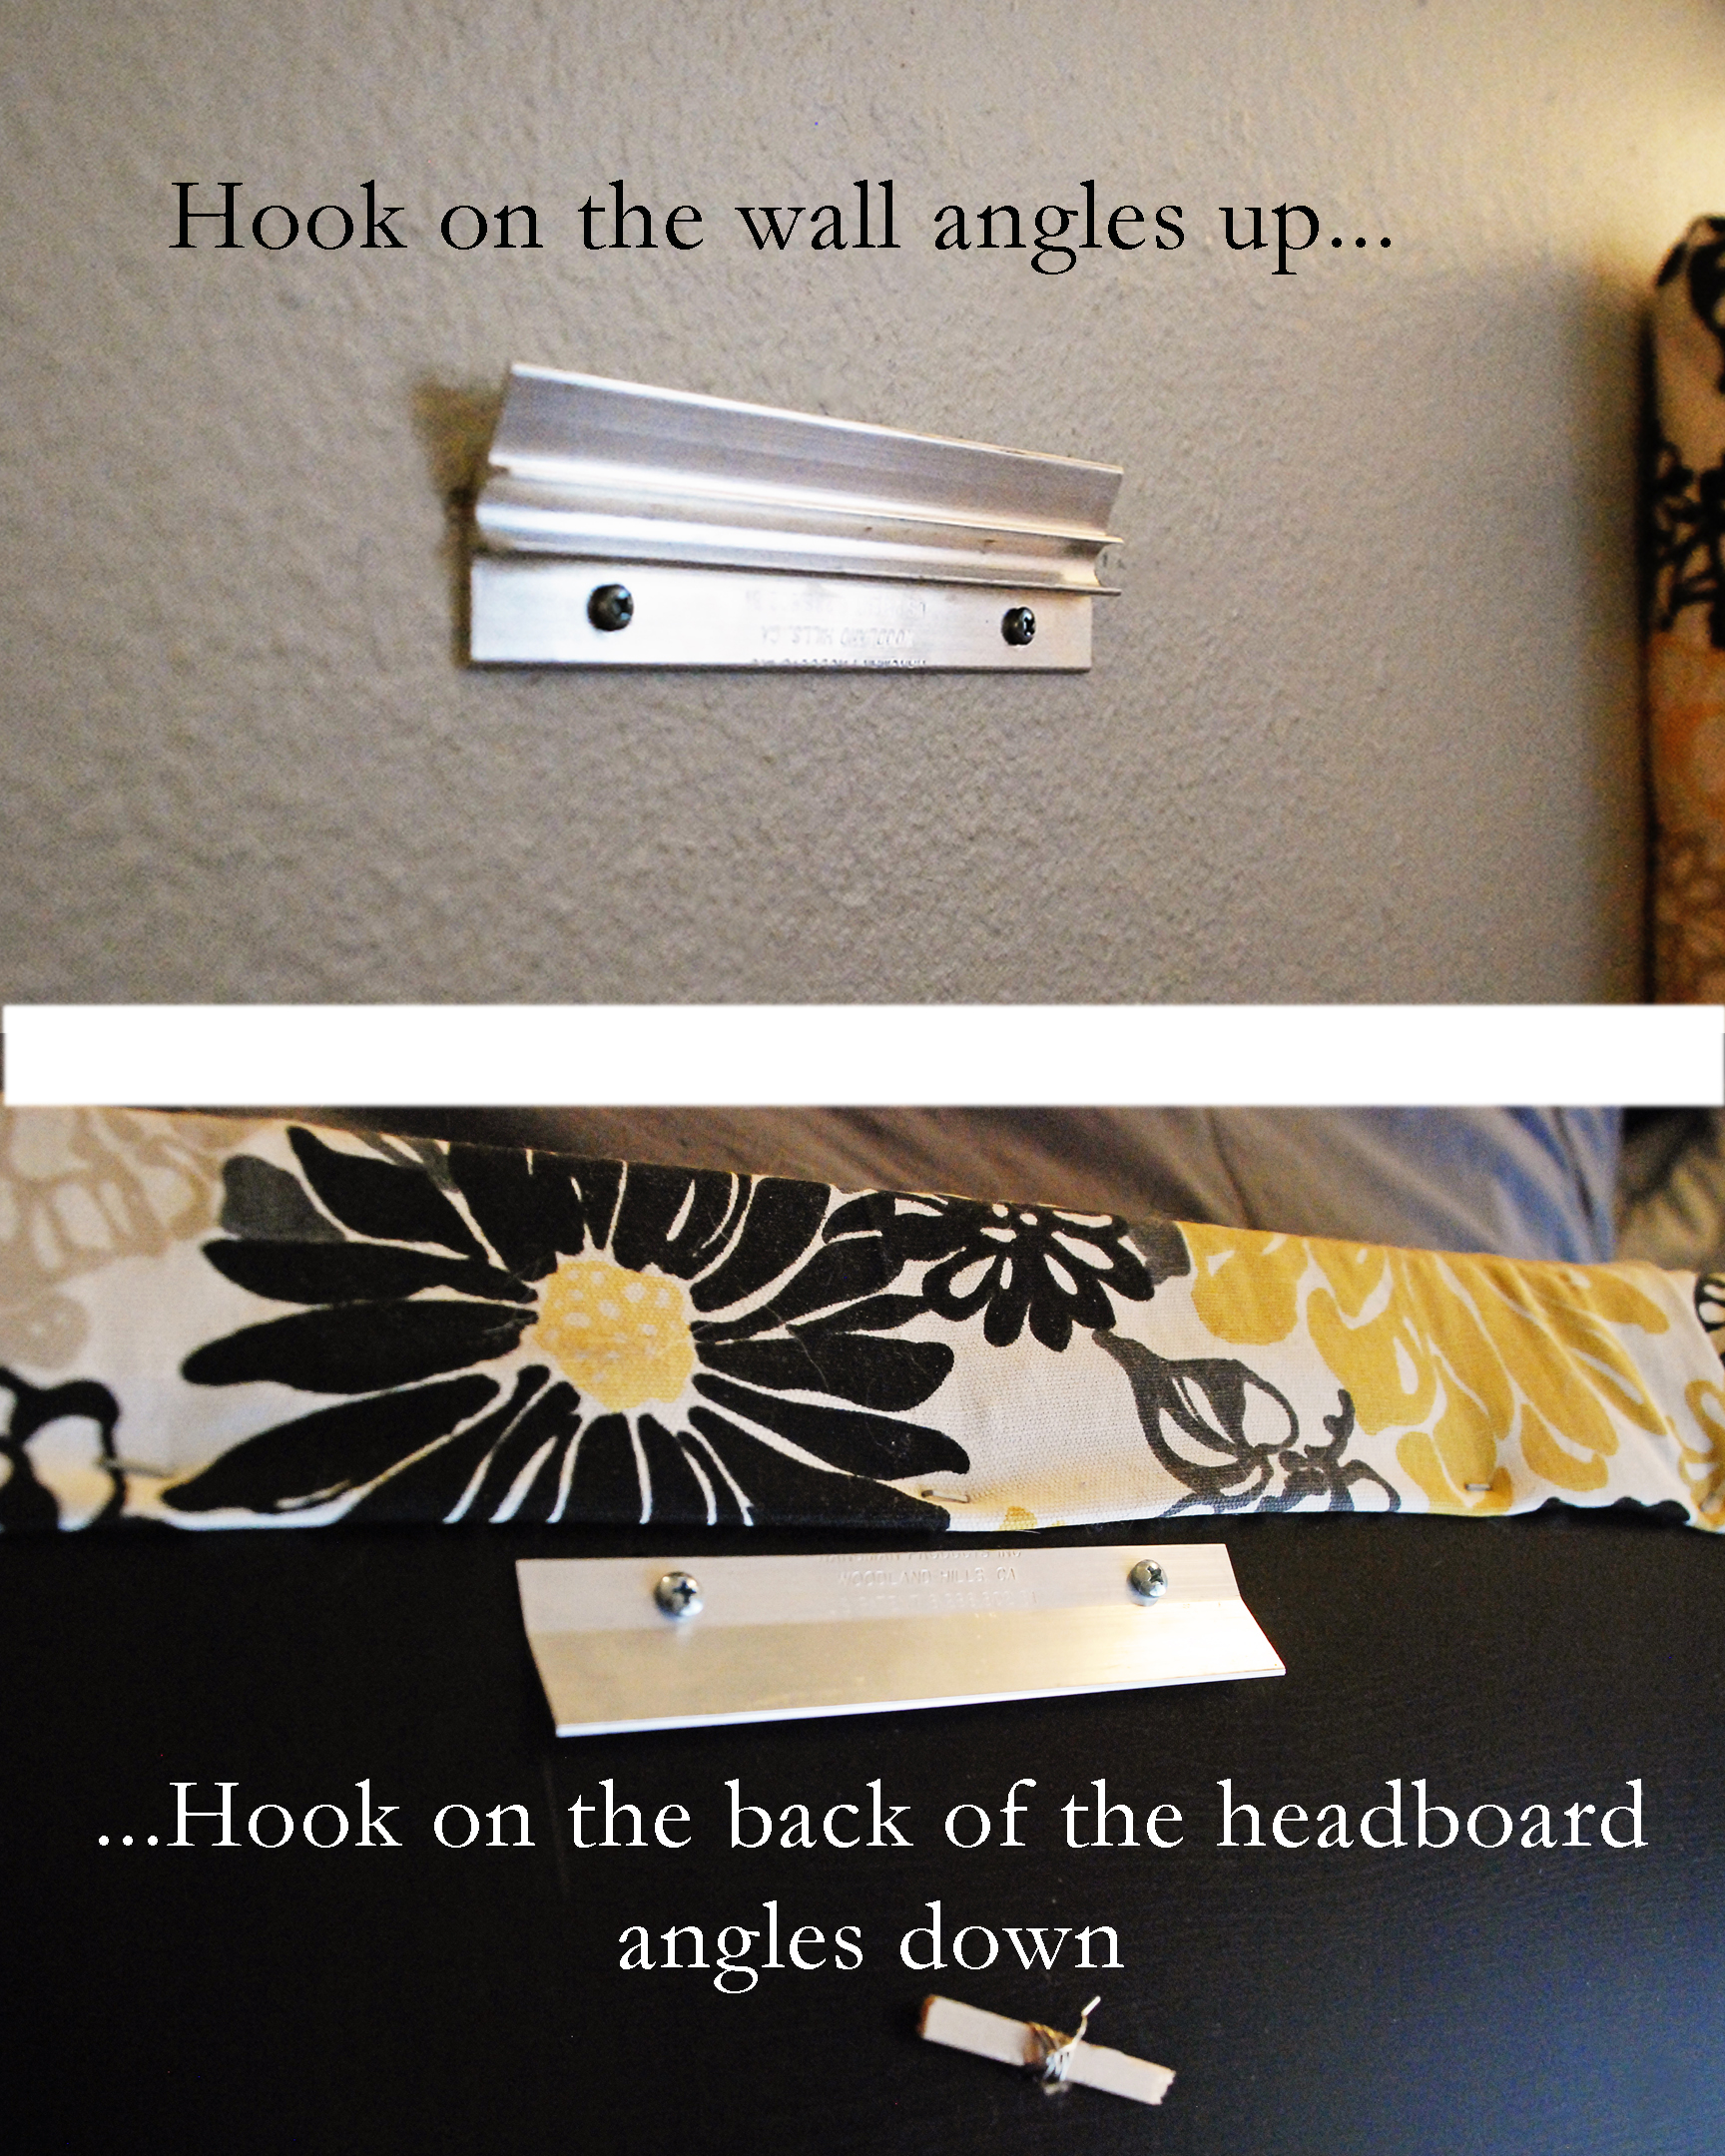
Step 8: Time to mount the headboards to the wall! I used a simple mount that I found at Lowe’s. The part on the back of the headboard angles downward, while the part on the wall angles upward, so the two parts of the mount fit together and allow the headboard to be flush against the wall. I’m sure there are plenty of other ways to mount it to the wall, some being more permanent, but I really like this way because it allows me to remove the headboard if need be…… like when I want to paint the room a new color or change the fabric on the headboard if I decide to redecorate!
And now there’s nothing left to do but sit back and enjoy your extremely affordable, one-of-a-kind headboard!!!

Feel free to leave comments or suggestions if you happen to think of an easier way to do any of the above! I’m always open to new ideas. 🙂
And of course I’d love to see your new headboards if/when you make them!
(As a side note, the mirrors hanging above the bed are a DIY project I made as well. But that’s a discussion for another day!)

yay! I have some fabric under the bed that needs a project like this. Re: the board you used, do you think plywood would work? This would be much thinner than what you used.
Awesome!!! So, where exactly did you find the wall mounts?
Sarah, I’m sure plywood could work as long as it’s thick enough. Plywood always make me nervous though because a lot of the time it’s not quite flat & bows a bit.
Olivia, I found the wall mounts at Lowe’s in the hardware section where they have picture hanging mounts. Here’s one that’s almost the same as the one I used (mine didn’t have a level, but boy would that be helpful!):
http://www.lowes.com/pd_56156-37672-122371_0__?productId=3058191&Ntt=picture+hanging+hardware&pl=1¤tURL=%3FNtt%3Dpicture%2Bhanging%2Bhardware&facetInfo=
Hope that helps! 🙂
Awesome blog! Do you have any suggestions for aspiring writers?
I’m hoping to start my own website soon but I’m
a little lost on everything. Would you recommend starting with a free platform like WordPress or
go for a paid option? There are so many choices out there that I’m completely overwhelmed
.. Any suggestions? Many thanks!
Hi Hannelore!
Sorry it took me so long to reply! I’ve actually been in the process of moving this blog since I realized I will quickly run out of space here on WordPress, even though I really like it here. Which is kind of an answer to the question you asked…. yes, I would definitely recommend starting with a free platform so you can figure out the things you do/don’t like about particular sites and blogs. Since my blog requires me to post a lot of photos, I moved over to weebly.com since there isn’t a space limit. Feel free to check it out and let me know what you think! http://www.diy2heaven.weebly.com
Thanks! 🙂
Wow that was strange. I just wrote an very long comment but after I clicked submit my comment didn’t appear.
Grrrr… well I’m not writing all that over again.
Anyways, just wanted to say superb blog!
Thank you so much! Sorry it took me so long to reply! I’ve actually been in the process of moving this blog since I realized I will quickly run out of space here on WordPress, even though I really like it here. 😦
But feel free to check out the new one at http://www.diy2heaven.weebly.com
Thanks! 🙂